Tutorial
Showing posts with label Tutorial. Show all posts

Tuesday, June 6, 2017

A Super Easy Father's Day Gift Idea


I am friends with Tiffzippy on Instagram and Twitter and I knew she has a laser cutting business, so I asked her if doing a profile silhouette was something she could make for me. She said yes, and I am so happy with the way it came out! I highly recommend contacting Tiffany if this project is something you'd like to do! Read more for steps on how to make your own framed silhouette.


Materials:


Birch wood laser cutout of child's profile from Tiffany (which is 8 inches tall and .25 inches thick)

I took about 100 photos of my kid in order to get one where I captured his face in a true profile and emailed it to Tiffany. She did the rest and shipped it to me.

Back acrylic paint (or any color you like)
Paint brush
12x12 white card stock (or any color you like)
12x12 picture frame or shadow box (if you get a frame, make sure there is a little space allowance between the glass front and the back closure since the silhouette cutout is thicker than a photo. My frame had a matboard inside so I knew it would fit). This frame is from Target.
Double sided craft adhesive

Steps:
Once I had all my materials, I painted my silhouette cutout with the black acrylic paint and let dry (though it would look pretty cool in other colors too!). I ended up applying two coats.


The cutout was burnt black by the laser as it was being cut all along the outside, so I didn't have to paint along the perimeter. But if you do have to paint yours, I recommend using a tiny paint brush to get inside all the little spaces and angles. Try not to let it get too goopy or the sharp details might get lost.

Remove the matboard from the frame (unless your silhouette is small enough to fit inside)
Make sure the card stock is trimmed so it will fit nicely inside the frame
Apply the adhesive to the back of your silhouette cutout and place it centered on the white card stock.
Place this inside the frame, and voila!

Monday, November 28, 2016

DIY Faux Fur Pom Pom Tutorial


I was crocheting this pretty awesome plaid hat (pattern by Whistle and Ivy), when I realized a fur pom pom would look pretty cool on top. But two of my local craft stores didn't have any in stock and Amazon sold them for too much money. Then I remembered I had a piece of furry fabric stored away in my craft supplies and voila, my own DIY faux fur pom pom tutorial!

This tutorial covers both an average sized pom pom and a jumbo sized pom pom.


To start, make a circle template. This circle is 5 inches in diameter and will make a great average sized pom pom, about 2 inches when finished. Trace the circle on the back of your fabric and cut.


For this tutorial, I used a contrasting color of embroidery floss, but you may wish to use a similar color thread so there won't be any chance of it showing in the finished product. Run the thread in and out around the circumference of the circle. This doesn't have to be perfect. Make sure to place your starting knot on the inside of the pom pom (the back part of the fabric that's facing you) and your final stitch coming through towards the same side.


Then gently pull the thread so it cinches the fabric closed, but don't pull it all the way, you have to stuff it first.


Gently stuff your pom pom enough so it won't collapse on itself, but not so full that it's rock hard.


Continue pulling the embroidery floss until the opening is completely closed and secure with a knot.


Here, I did the same thing but with a 8 inch circle to make a jumbo pom pom, which is about 5 inches when finished.


Monday, July 20, 2015

DIY Pom Pom Nursery Mobile: A step-by-step tutorial


I knew I wanted to make as many of my own nursery decorations as I could (so far we have blackout drapes, pillows, blankets, and now this mobile). And once I realized how easy it is to make your own pom poms, I was set on putting together a custom colored mobile for baby D's nursery. I am so happy with how it came out! It took me a while to finish, but only because it was sort of a figure-it-out-as-you-go project for me. I didn't follow a tutorial, I made my own!

So this post will not only give you a sneak peek at the nursery, but also a step-by-step tutorial on how to make your own pom pom nursery mobile.


Materials

  • Embroidery hoop - 10 inch diameter

  • 2 paint colors of your choice (I used a white and black acrylic)

  • Foam sponge brush

  • 6 yarn colors of your choice, a 100g ball in each color will be enough
    (I made pom poms with Cascade Sateen Worsted, found here from Craftsy, in opal, goldenrod, silver, true blue, and emberglow. The string portions were in cream).

  • Clover pom pom makers in 3 different sizes: 1 ⅜ inch, 1 ⅝ inch, and 2 ½ inch

  • Gorilla glue (or regular craft glue. Takes longer to dry though).

  • Yarn needle

  • Pencil

  • Measuring tape

  • Sharp scissors

  • Thin metal wire and wire cutters


Directions
1. Start by making all your pom poms. (This is a great video tutorial on how to use your Clover pom pom maker!) I made 6 large, 18 medium, and 13 small. Secure each of your 6 large pom poms with a very long piece of white yarn instead of using the same color yarn like you usually would (you can see what I mean in her video at 1 min and 39 seconds in). I'd say use about 4 feet and tie the knot in the middle. This white yarn will be what you use to string all the other pom poms to later and tie to the embroidery hoop so you want this long. You can tie all the other sized pom poms with the same color yarn as the pom pom itself.

2. Take apart your embroidery hoop, and paint both pieces inside and out with white (or whatever color you choose). I did 2 coats. When dry, take your measuring tape and wrap it snuggly around the outside of the larger outer hoop. Mark with a pencil every inch around (or whatever space interval you choose). Take your foam paint brush and dab it in the black paint (or whatever color you choose). Press it lightly but firmly on each pencil mark all the way around to make your lines. Let dry, set aside.

3. Play around with the color arrangement of your pom poms so you won't end up with two colors too close together. Now you will begin stringing the bottom dangling portion of pom poms together. Here's how:

  • Take a large pom pom, thread a yarn needle onto one piece of the white yarn that you left really long. Next, poke your needle through the very center of a medium pom pom, and pull it onto the yarn. Do this again with another medium pom pom, and finally a small pom pom. You will have 4 pom poms making up each bottom dangling portion, including that large one. Do not knot them yet. Do the same thing with all the rest of your large pom poms. You will have 6 medium and 7 small pom poms left over for the remaining top portion.


4. Now, you will take each dangling string of pom poms and attach them with a double knot to the outer embroidery hoop with the stripes. Make sure your knots are facing the inside of your hoop so you won't see them. Space them out as evenly as you can. Once you are happy with the spacing, secure each knot with some gorilla or craft glue. Just dab a blob on each knot. Leave the other end of the white yarn (without the pom poms), to be used for the top portion, alone for now. Let glue dry, set aside.

5. At this point you can insert the inner hoop back into the larger outer hoop and secure with the screw on the outside as tight as you can to hold things together. This inner hoop will hide the knots!

6. Now we will put the pom poms on the top portion. On each top string, thread on a medium pom pom, and then a small pom pom.

7. Carefully gather all the pieces of string from the top portion in one hand to secure in a knot leaving a loop to hang the mobile later. But make sure your mobile isn't lopsided! It may take a few minutes to get the tension right with each string before you make the knot. Once you make the knot, do not cut the extra off just yet.


8. Once you have your top knot done, it helps to have a place to hang your mobile now, so you can arrange the top and bottom pom poms evenly. I hung mine on a metal wall mounted plant hanger. Or you can use a very patient friend!

9. Now you will space out the bottom pom poms and secure them on with a knot at the bottom. To do this, the piece of string that's hanging out of the bottom of the smallest pom pom, you will thread with your yarn needle, and insert your needle back up into the bottom of the pom pom and come out the top. Don't pull it too hard. Make a strong knot here to the other white string and snip the tail so it hides in with the rest of the pom pom. Don't snip too close to the knot, it might fall out. Do this for all remaining pieces.

10. You should have 1 small pom pom left. This one will go on the very tippy top covering the knot below the hanging loop. In order to thread this hanging loop through the center of the pom pom, you'll need to make a makeshift needle. Cut a 6 inch piece of thin metal wire, insert it through the yarn loop and twist the wire closed. Now poke the pointy end of wire through the center of the pom pom and pull the yarn loop through until the knot hides in the center of the pom pom. Now you can cut the white yarn ends so they hide inside. Don't cut too close to the knot though.

That's it!
And just as a note for safety, I recommend hanging this mobile above the changing table or nursing chair instead of the crib just in case your pom poms come loose and may fall on baby.


Craftsy

DIY Pom Pom Nursery Mobile: A step-by-step tutorial


I knew I wanted to make as many of my own nursery decorations as I could (so far we have blackout drapes, pillows, blankets, and now this mobile). And once I realized how easy it is to make your own pom poms, I was set on putting together a custom colored mobile for baby D's nursery. I am so happy with how it came out! It took me a while to finish, but only because it was sort of a figure-it-out-as-you-go project for me. I didn't follow a tutorial, I made my own!

So this post will not only give you a sneak peek at the nursery, but also a step-by-step tutorial on how to make your own pom pom nursery mobile.


Materials
  • Embroidery hoop - 10 inch diameter

  • 2 paint colors of your choice (I used a white and black acrylic)

  • Foam sponge brush

  • 6 yarn colors of your choice, a 100g ball in each color will be enough
    (I made pom poms with Cascade Sateen Worsted, found here from Craftsy, in opal, goldenrod, silver, true blue, and emberglow. The string portions were in cream).

  • Clover pom pom makers in 3 different sizes: 1 ⅜ inch, 1 ⅝ inch, and 2 ½ inch

  • Gorilla glue (or regular craft glue. Takes longer to dry though).

  • Yarn needle

  • Pencil

  • Measuring tape

  • Sharp scissors

  • Thin metal wire and wire cutters

Directions
1. Start by making all your pom poms. (This is a great video tutorial on how to use your Clover pom pom maker!) I made 6 large, 18 medium, and 13 small. Secure each of your 6 large pom poms with a very long piece of white yarn instead of using the same color yarn like you usually would (you can see what I mean in her video at 1 min and 39 seconds in). I'd say use about 4 feet and tie the knot in the middle. This white yarn will be what you use to string all the other pom poms to later and tie to the embroidery hoop so you want this long. You can tie all the other sized pom poms with the same color yarn as the pom pom itself.

2. Take apart your embroidery hoop, and paint both pieces inside and out with white (or whatever color you choose). I did 2 coats. When dry, take your measuring tape and wrap it snuggly around the outside of the larger outer hoop. Mark with a pencil every inch around (or whatever space interval you choose). Take your foam paint brush and dab it in the black paint (or whatever color you choose). Press it lightly but firmly on each pencil mark all the way around to make your lines. Let dry, set aside.

3. Play around with the color arrangement of your pom poms so you won't end up with two colors too close together. Now you will begin stringing the bottom dangling portion of pom poms together. Here's how:
  • Take a large pom pom, thread a yarn needle onto one piece of the white yarn that you left really long. Next, poke your needle through the very center of a medium pom pom, and pull it onto the yarn. Do this again with another medium pom pom, and finally a small pom pom. You will have 4 pom poms making up each bottom dangling portion, including that large one. Do not knot them yet. Do the same thing with all the rest of your large pom poms. You will have 6 medium and 7 small pom poms left over for the remaining top portion.
4. Now, you will take each dangling string of pom poms and attach them with a double knot to the outer embroidery hoop with the stripes. Make sure your knots are facing the inside of your hoop so you won't see them. Space them out as evenly as you can. Once you are happy with the spacing, secure each knot with some gorilla or craft glue. Just dab a blob on each knot. Leave the other end of the white yarn (without the pom poms), to be used for the top portion, alone for now. Let glue dry, set aside.

5. At this point you can insert the inner hoop back into the larger outer hoop and secure with the screw on the outside as tight as you can to hold things together. This inner hoop will hide the knots!

6. Now we will put the pom poms on the top portion. On each top string, thread on a medium pom pom, and then a small pom pom.

7. Carefully gather all the pieces of string from the top portion in one hand to secure in a knot leaving a loop to hang the mobile later. But make sure your mobile isn't lopsided! It may take a few minutes to get the tension right with each string before you make the knot. Once you make the knot, do not cut the extra off just yet.


8. Once you have your top knot done, it helps to have a place to hang your mobile now, so you can arrange the top and bottom pom poms evenly. I hung mine on a metal wall mounted plant hanger. Or you can use a very patient friend!

9. Now you will space out the bottom pom poms and secure them on with a knot at the bottom. To do this, the piece of string that's hanging out of the bottom of the smallest pom pom, you will thread with your yarn needle, and insert your needle back up into the bottom of the pom pom and come out the top. Don't pull it too hard. Make a strong knot here to the other white string and snip the tail so it hides in with the rest of the pom pom. Don't snip too close to the knot, it might fall out. Do this for all remaining pieces.

10. You should have 1 small pom pom left. This one will go on the very tippy top covering the knot below the hanging loop. In order to thread this hanging loop through the center of the pom pom, you'll need to make a makeshift needle. Cut a 6 inch piece of thin metal wire, insert it through the yarn loop and twist the wire closed. Now poke the pointy end of wire through the center of the pom pom and pull the yarn loop through until the knot hides in the center of the pom pom. Now you can cut the white yarn ends so they hide inside. Don't cut too close to the knot though.

That's it!
And just as a note for safety, I recommend hanging this mobile above the changing table or nursing chair instead of the crib just in case your pom poms come loose and may fall on baby.


Craftsy

Wednesday, November 13, 2013

How to crochet a magic ring / magic loop / adjustable ring


A magic ring (also called a magic loop or adjustable circle) is a way to start a crochet project so you won't have a gaping hole in the center of the project like if you were to start with a chain instead. It is used mostly in projects where you are crocheting in the round....so amigurumi or hats or mittens. You can also start a granny square this way too. Sometimes the hole is desired for aesthetic reasons but I prefer it to be closed.

Here's how I make a magic ring (PS- I am right handed).

1. Start with placing the yarn between your ring finger and pinky on your non-dominant hand. With your dominant hand, hold the end of the yarn.


2. Turn your hand palm up and now place the yarn on the top of your middle finger. Leave a few inches because this will be the tail that you can weave in later.


3.Wrap the yarn around your middle finger creating an X on your finger tip.


4.Bring your thumb down pinching the X together and once you have a good grip, slip the loop that is around your fingertip off and hold it tight.


4a. This is what it looks like if you lift your thumb. But don't do that :) I'm showing you this because you could essentially bypass all these steps so far and just make this shape. But it's easier to have a specific method so your fingers don't go wonky when you are first learning this. Also it's good to do all these steps so your yarn is already in place to be picked up by the hook, like in step 6.


5. Insert your hook into the loop.


6.Yarn over and pull the yarn through the loop.


7. This is what it looks like. Now chain 1. This stitch does NOT count towards your single crochet stitches.


8. The hard part is over. Now you are going to do single crochets in the large hole (in patterns they will say something like this: "6 SC in magic ring"). Here I am doing my first SC into the ring.


9. First single crochet done. Be sure to do your single crochets around the straggling end! See how there are 2 pieces of yarn between my thumb and pointer? One is the loop, one is the straggler.


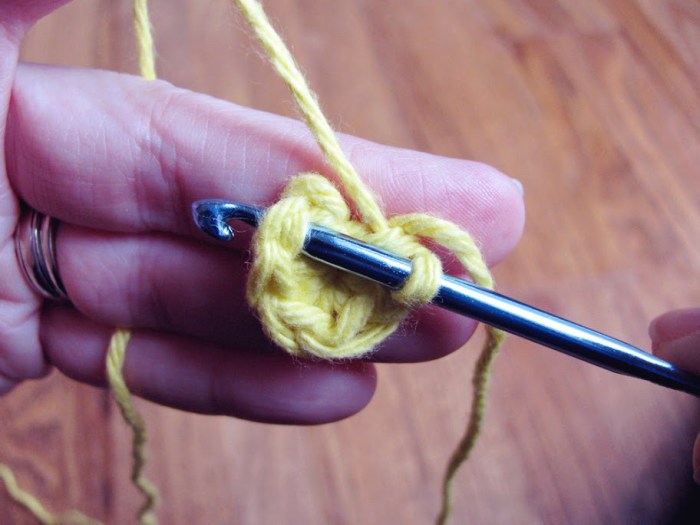
10. I put five more single crochets in the center of the ring, so there are 6 SC in the magic ring. It may look like a jumbled mess of single crochets but don't worry about that. Just keep your fingers holding the loop and keep making your single crochets. You can flatten them out when you finish the round.


11. Now the magic part! Gently pull the straggling end of the yarn so the hole closes up. Don't pull too tight at this point because otherwise you will have a hard time getting your hook into the next stitch to start the next round. You can pull the string at any point in your project. Also, your work won't look like a circle until you make your next stitch, beginning the next round.


12. The magic ring is now officially done. And you can continue on to the next round.


13. Here's one more round added with increases to make it bigger. Continue spiraling along and adding increases according to your pattern to make it larger. Don't forget to use a stitch marker so you know where the beginning of the round is!

Monday, November 4, 2013

How to make a crochet star

how to crochet a star photo tutorial
I thought for November's crochet-along project we could make something with stars. A garland, an ornament, anything. Come back around November 27th to link up and share what you made. Here's an easy tutorial on how to make one!

This pattern is written using US terms.

Star pattern:


Start with a magic ring. 15 Dc into the ring.
Click here for my video tutorial on how to make a magic ring.
crochet star tutorial

Slip stitch to join in top of first DC. Pull the tail to close the hole (or leave it open if you wish). Chain 6.
crochet star tutorial

SC in third stitch from hook. HDC in next stitch. Dc in next two stitches.
crochet star tutorial

Skip two stitches. Slip stitch in third stitch to anchor down star arm. Repeat these last three steps 4 more times.
crochet star tutorial

When you get to the last arm of the star, you will slip stitch into the first stitch, then finish off. Weave in ends.
crochet star tutorial

crochet star tutorial

How to block your stars:


You may wish to block your star so the arms stay flat. It's very simple to do this. All you need is a piece of cardboard, some pins, and a spray bottle of water. Flatten and stretch the star to the shape you want it to be in when dry. Pin them in that position to the cardboard. Spray liberally with water and let air dry.

(Psst, I cheated by using a hairdryer to dry them because I was impatient - my yarn was wool so I wasn't worried about melting, but acrylic may melt this way- so be careful and maybe test one first).

When completely dry, remove the pins and you're done!

Here's a blocking before and after:


© Habitual Homebody
Maira Gall