

A magic ring (also called a magic loop or adjustable circle) is a way to start a crochet project so you won't have a gaping hole in the center of the project like if you were to start with a chain instead. It is used mostly in projects where you are crocheting in the round....so amigurumi or hats or mittens. You can also start a granny square this way too. Sometimes the hole is desired for aesthetic reasons but I prefer it to be closed.
Here's how I make a magic ring (PS- I am right handed).
1. Start with placing the yarn between your ring finger and pinky on your non-dominant hand. With your dominant hand, hold the end of the yarn.

2. Turn your hand palm up and now place the yarn on the top of your middle finger. Leave a few inches because this will be the tail that you can weave in later.

3.Wrap the yarn around your middle finger creating an X on your finger tip.

4.Bring your thumb down pinching the X together and once you have a good grip, slip the loop that is around your fingertip off and hold it tight.

4a. This is what it looks like if you lift your thumb. But don't do that :) I'm showing you this because you could essentially bypass all these steps so far and just make this shape. But it's easier to have a specific method so your fingers don't go wonky when you are first learning this. Also it's good to do all these steps so your yarn is already in place to be picked up by the hook, like in step 6.

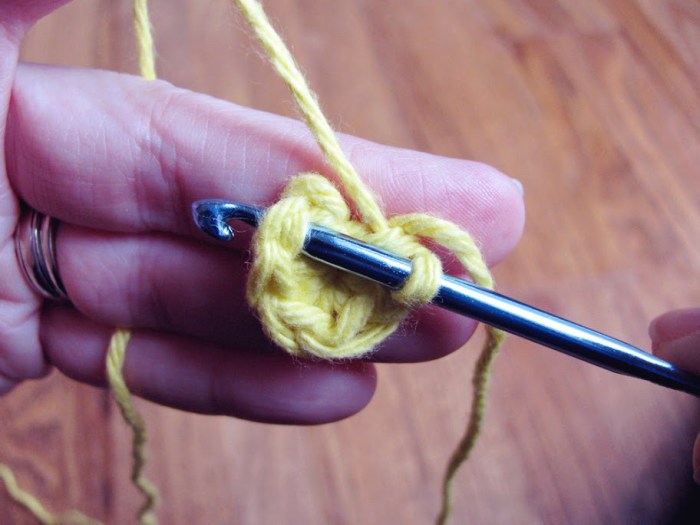
5. Insert your hook into the loop.

6.Yarn over and pull the yarn through the loop.

7. This is what it looks like. Now chain 1. This stitch does NOT count towards your single crochet stitches.

8. The hard part is over. Now you are going to do single crochets in the large hole (in patterns they will say something like this: "6 SC in magic ring"). Here I am doing my first SC into the ring.

9. First single crochet done. Be sure to do your single crochets around the straggling end! See how there are 2 pieces of yarn between my thumb and pointer? One is the loop, one is the straggler.

10. I put five more single crochets in the center of the ring, so there are 6 SC in the magic ring. It may look like a jumbled mess of single crochets but don't worry about that. Just keep your fingers holding the loop and keep making your single crochets. You can flatten them out when you finish the round.

11. Now the magic part! Gently pull the straggling end of the yarn so the hole closes up. Don't pull too tight at this point because otherwise you will have a hard time getting your hook into the next stitch to start the next round. You can pull the string at any point in your project. Also, your work won't look like a circle until you make your next stitch, beginning the next round.

12. The magic ring is now officially done. And you can continue on to the next round.
13. Here's one more round added with increases to make it bigger. Continue spiraling along and adding increases according to your pattern to make it larger. Don't forget to use a stitch marker so you know where the beginning of the round is!

Well explained, I never seem to be able to do a magic ring but this has really helped, thanks
ReplyDeleteThank ypu so much easier than all the other ones I have seen this evening, its so simple to understand what you have shown.. thank you again.
ReplyDelete